
Personalized digital products are a different beast from standard digital delivery. You’re not selling the same file to every buyer — each order gets a custom file generated based on the buyer’s input: a wedding invitation with their names, a personalized birthday card, a custom portrait, a resume template filled in with their info, a custom-made print.
The mechanical challenge is that Shopify’s standard digital delivery assumes the file is ready and attached to the product before the order is placed. Personalized products break that assumption in a specific way: the file doesn’t exist until after the order is placed, which means you need a way to attach a unique file to a specific order after the fact.
This post walks through how to set up personalized digital products on Shopify using Fileflare’s per-order file attachment.
How the workflow actually goes
Unlike a standard digital product where the file is uploaded once and delivered to every buyer automatically, personalized products follow this flow:
- Buyer places an order with their personalization details (name, date, custom text, uploaded reference image, etc.) captured through Shopify’s line-item properties or a form.
- You receive the order notification and the custom inputs.
- You create the personalized file — open Illustrator, design the asset or fill in the template, export the PDF. Or run it through your custom generator if you’ve automated the creation.
- You attach the file to the specific order in Fileflare’s admin.
- You manually trigger the delivery email from the order page, which sends the buyer a download link.
The buyer’s experience looks identical to a standard digital product from their side: they place an order, wait a few hours (or however long you take to create the file), and get a delivery email with the download link.
For simple personalization (e.g. adding a name or address to a PDF), consider PDF stamping as an alternative. You can stamp or watermark buyer details directly onto a PDF.
Setting it up in Shopify
A few pieces need to line up to deliver a personalized file.
1. Capture the personalization inputs at checkout
The standard way to gather personalization details is by using Shopify’s line-item properties — a set of custom input fields on the product page that attach to the order line. You have a few options to add them:
- Native line-item properties via your theme (every Shopify theme supports these, usually under Product → Additional Options or similar). Good for text fields; clunky for file uploads.
- Dedicated customization apps like Infinite Options or Product Customizer (free plan available). These give you richer input types (dropdowns, file uploads, conditional logic).
- For file uploads from buyers, you’ll need an app that specifically handles that — the native Shopify line-item properties don’t support attachments. (Fileflare handles delivery of files; for accepting uploaded files from buyers at checkout, look at dedicated file-upload apps.)
Whatever you pick, the buyer’s input lands on the order record so you can see it when you go to create the personalized file.
2. Configure the product in Shopify
The product itself is a standard Shopify product:
- Disable “This is a physical product” (no shipping).
- Disable “Track quantity” (personalized products effectively have unlimited inventory).
- Set a price that covers your time. Personalized products should be priced higher than equivalent non-personalized ones — you’re trading time for margin, and buyers expect to pay for customization.
Don’t attach any files to the product itself. Leave the Fileflare attachment blank at the product level. Files will be attached per-order, after the order comes in.
3. Attach the personalized file to the specific order
When an order comes in:
- Open the order in Shopify admin and review the personalization inputs (the line-item properties).
- Create the personalized file (your own workflow — manual in Illustrator, automated via a template tool, or a custom script).
- Upload the file in Fileflare and attach it to the specific order (not to a product). Fileflare has a per-order attachment UI that’s exactly for this workflow.
- Send the delivery email from Fileflare’s order admin. The buyer gets a standard download link.
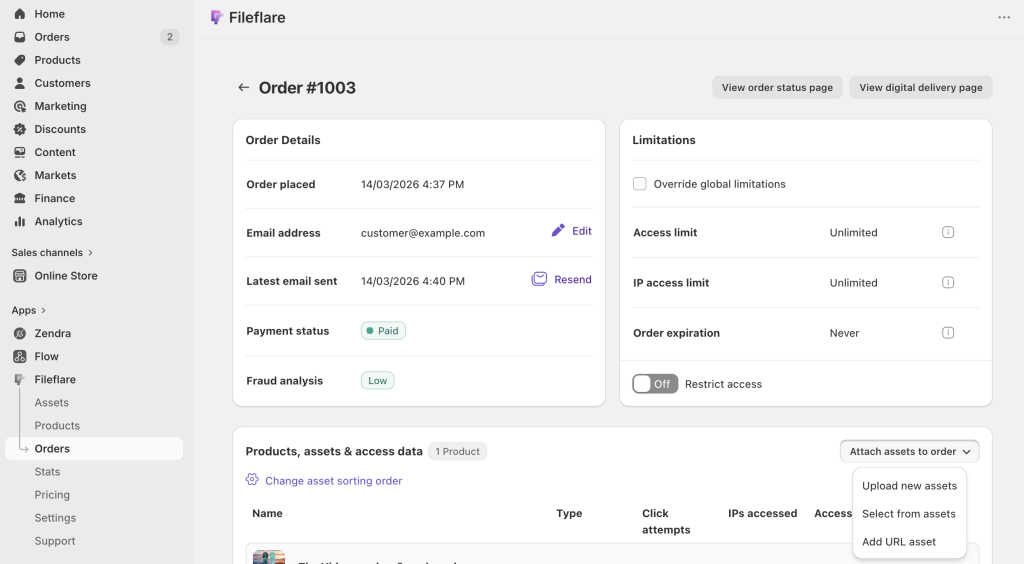
Fileflare also supports this via REST API — if you’ve automated the file generation and want to skip the manual admin step, you can POST to Fileflare’s API to upload and attach the file, then trigger the delivery email programmatically.
A few practical tips
- Set clear turnaround expectations on the product page. “Delivered in 2–3 business days” prevents “where’s my file?” support tickets. Buyers are patient when they know upfront; they’re angry when they were expecting instant delivery.
- Send an acknowledgment email manually. Shopify sends the standard order confirmation, but a personal “got your order, working on it now” email from you reduces anxiety during the waiting period.
- Keep the original templates organized. If you’ll be creating the same base file hundreds of times with different personalization, a clean template library in Illustrator, Figma, or wherever you work saves real hours.
- Batch your work. If you get 20 orders a day, creating them one at a time as they come in is inefficient. Queue them and batch-process once a day — same quality to the buyer, much less cognitive load.
- For repeat-buyer products (like annual holiday cards), save the personalization inputs on the customer’s record. Next time they order, you’ve got their names / kids’ names / dog’s name already. Less back-and-forth.
- Print lock or annotation lock the PDFs you deliver if the content is high-value. Fileflare supports both on Basic+ tiers. These tools are useful for wedding invitation designers, personalized artists, custom portrait sellers — any industry where the file could be shared as a gift but shouldn’t be resold.
- Price for the per-order effort, not the average effort. A simple personalization (names on a template) takes 5 minutes; a complex one (custom illustration) takes hours. If you have a wide range, offer different tiers at different price points rather than averaging.
Automation options (if you get busy)
Once volume gets high enough, manually creating files for each order becomes the bottleneck. A few patterns that work:
- Template-driven generation. Tools like Adobe’s InDesign data merge, or Bannerbear, Placid, or Switchboard can take the order’s personalization inputs and output a finished file automatically. You approve or edit before shipping.
- Zapier / Make automations. Order comes in → inputs go to a generator → generated file gets uploaded to Fileflare via API → order gets the file attached → delivery email fires. End-to-end automated for simple cases.
- For customizable printables (wedding invitations, kids’ party invites), a self-serve tool like Canva’s template-sharing flow lets the buyer customize the file themselves. You sell access to the template; they do the filling-in. Less work for you, though the product experience is different from “fully finished personalization.”
Most personalized-product sellers we talk to start manual, stay manual longer than expected, and only automate once volume is forcing it.
Get started
Fileflare’s free plan supports per-order file attachment — the core feature that makes personalized digital products work. 1 GB storage, unlimited products, unlimited bandwidth.
For the full setup, the complete guide to selling digital downloads on Shopify covers the whole stack.