
Selling digital products on Shopify is one of the highest-margin things you can do in ecommerce. There’s no shipping, no inventory, no warehouse, no restocks; one file can be sold an unlimited number of times. That’s also why the space is crowded and why doing it well matters.
This guide walks you through the full setup from a blank Shopify store to a production-ready digital download experience: creating the product, uploading and attaching files, delivering them to buyers the moment the order is placed, customizing what customers see, and locking things down so your files aren’t shared across the internet within a week.
Shopify can sell almost any digital product you can upload:
- Ebooks and PDFs
- Printables — wall art, planners, worksheets, sheet music
- Music, stems, and audio samples
- Video courses, tutorials, and stock footage
- Design assets — fonts, icons, Canva templates, LUTs, Lightroom presets
- Software, plugins, and license keys
- Game assets, 3D models, and textures
The catch: the platform doesn’t support downloadable products natively. Shopify offers a free first-party app called Digital Products, and while it works for a low-volume side project, it runs into hard limits fast.
- The 5 GB file size cap rules out most video and archive bundles.
- There’s no watermarking, no IP-level access control, no branded download page — buyers click a raw S3-style link from an email that looks nothing like your store.
- There’s no notification system for version updates, no way to import historical orders after the fact, no analytics.
For anyone serious about selling digital products on Shopify, you need an app that handles delivery properly.
The guide below uses Fileflare for the delivery, protection, and download-page pieces. Most of the Shopify-side setup would apply to any digital downloads app you pick.
Want someone to do this for you? We offer paid setup and migration help — whether you’re launching a new Shopify store, moving from Etsy or Gumroad, or switching from another digital downloads app. If you’d rather skip the DIY, that’s a good path.
Before you start
A short list of what you need in place before you follow this guide.
On the Shopify side:
- An active Shopify store (any plan — digital downloads work on Basic, Shopify, Advanced, and Plus).
- A theme. Any Shopify 2.0 theme is fine. A theme that supports custom pages will give you more room to customize the download page layout, but it’s not required.
- An understanding of whether you’ll charge sales tax on digital products. Tax treatment varies by country and state. Shopify handles the calculation, but you’ll need to enable digital-goods tax in your Markets settings if applicable.
On the Fileflare side:
- The Fileflare app installed. The free plan covers the walkthrough in this post — you can upgrade later if your catalog or order volume demands it.
- Your files, ready to upload. Fileflare supports any file type — PDFs, ZIPs, MP4/MOV, MP3/WAV/FLAC, images, design files, software installers, archives. Managed cloud storage covers most catalogs out of the box.
If you have a very large catalog — hundreds of gigabytes of video or high-resolution assets — Fileflare also supports connecting your own AWS S3 or S3-compatible bucket so the files live on your infrastructure. For the rest of this guide we’ll assume managed storage.
If you’re starting from zero and don’t have a Shopify store yet, set that up first. Shopify’s own onboarding walks you through the basics in about 20 minutes; the digital product work starts after that.
If you’re earlier in the decision process, two background reads help: what counts as a digital product and how digital downloads actually work from checkout to file. Both are short overviews; this guide picks up where they leave off.
Step 1: Create the Shopify product
Everything in Shopify hangs off a product. Even if what you’re “selling” is a file, you need a product record for the order to attach to.
In your Shopify admin, go to Products → Add product. A few things matter here:
- Title and description. Write for a buyer, not a search engine. For a PDF, say what they’re getting, how many pages, what format, what they’ll learn or use it for. For music, list track count, total runtime, and bitrate. Be specific — digital product pages convert better when buyers can picture exactly what they’re buying.
- Media. Add preview images. For ebooks and printables, this is usually a mockup of the file on a device or a printed mockup on a wall. For music, album artwork plus a short preview clip works well. For video, a thumbnail frame plus a few seconds of preview footage.
- Pricing. Set the price for the primary variant.
- Inventory. Disable the “Track quantity” setting — after all, digital products don’t run out! (Unless you want to offer a limited drop or run — in which case, track the quantity like a physical product.)
- Shipping. This is the critical toggle. Disable This is a physical product. This tells Shopify the product doesn’t require shipping, skips the shipping-rate calculation at checkout, and removes the “weight” field. Without this disabled, Shopify may ask for shipping info at checkout for a product that has no shipping.
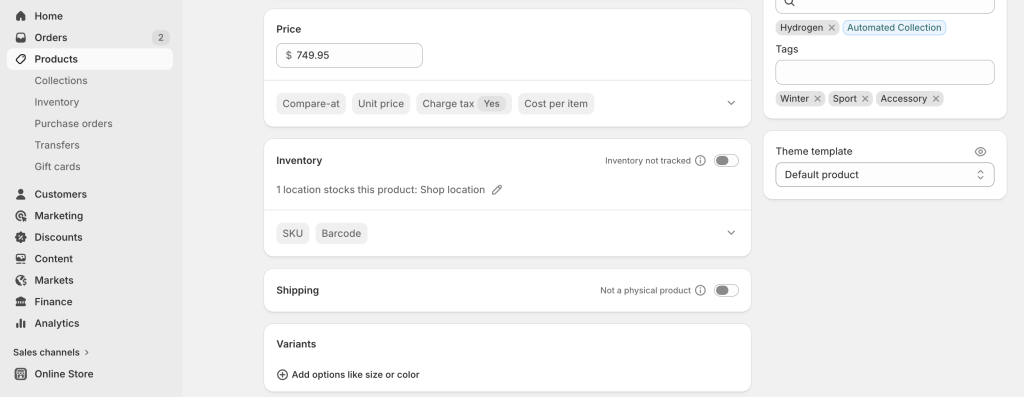
- Variants (optional). If you sell the same digital product in multiple formats — say an ebook as both PDF and EPUB, or a photo pack in multiple resolutions — create variants. Variant-level file attachment in Fileflare means each variant can deliver a different file (or set of files) without splitting into separate products. A customer buying the “PDF + EPUB” variant gets both files. A customer buying the “PDF only” variant gets just the one.
Save the product. If this is a customer-facing store, you’ll probably want to put it in draft status until you’ve finished the Fileflare setup below — otherwise someone could technically buy a product with no file attached yet.
Step 2: Install Fileflare and upload your file
Install Fileflare from the Shopify App Store. The first-run onboarding walks you through a four-step checklist — create a product, upload a file, attach it, customize delivery. You can follow the onboarding or jump straight into the app navigation.
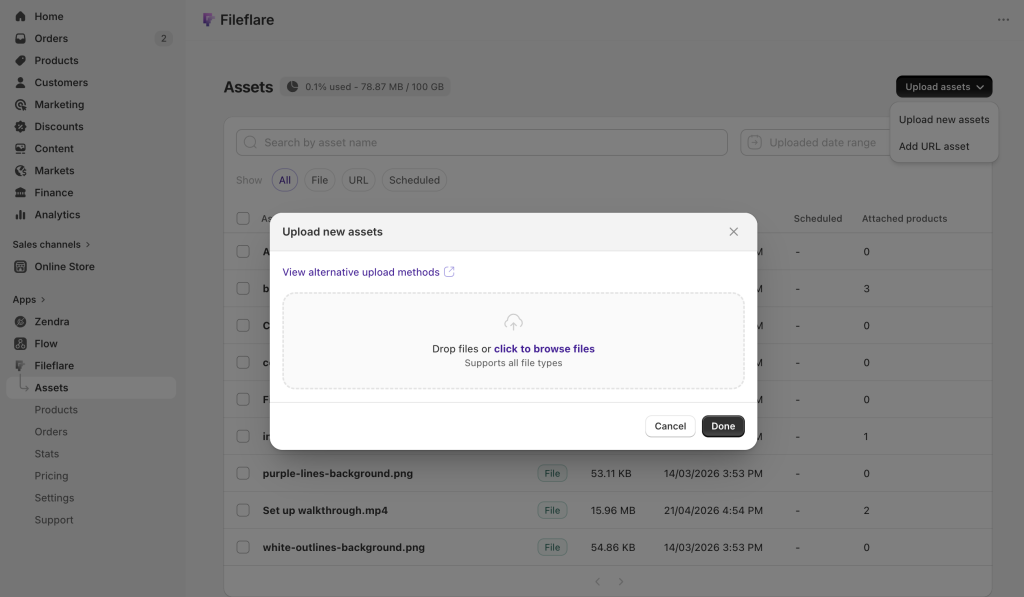
Go to Fileflare → Assets. This is your file library — every file Fileflare manages lives here. Click Upload and drag in the file you want to sell.
A few details about how Fileflare handles storage:
- Managed cloud storage is the default. Your files are stored on Fileflare-hosted infrastructure with plan-based storage quotas. No configuration needed — upload and they’re live.
- URL-based assets are the second option. Instead of uploading a file, you can paste a URL to content hosted elsewhere — a course platform, a Vimeo link, a Google Drive share, a Notion page. Fileflare delivers the link to the buyer as if it were a file. Useful for templates on external platforms, but note that Fileflare can’t add protections (like download limits or IP restrictions) to external files!
- Custom S3 storage is available for merchants with very large catalogs on the Premium plan. You connect your own AWS S3 (or S3-compatible) bucket and Fileflare serves files directly from it. Good for anyone with hundreds of gigabytes of video or large archive bundles. Full setup guide lives in the Fileflare docs — skip it unless you actually need it.
Once the upload finishes, the asset appears in your library with a name, file size, and type. You can rename it, add a description, or delete it from here. You can’t edit the file itself — if the content changes, you upload a replacement (covered in Step 7 below).
Step 3: Attach files to your products
An asset sitting in your library doesn’t do anything on its own. Customers only get it when the asset is attached to a Shopify product, and they buy that product.
There are three ways to attach:
1. Attach to products
From the product page in Fileflare. Go to Fileflare → Products, pick the Shopify product you just created, and click Attach asset. Pick the file from your library. It’s now linked to the product. Every future order for that product (or variant) will include a download link for that file.
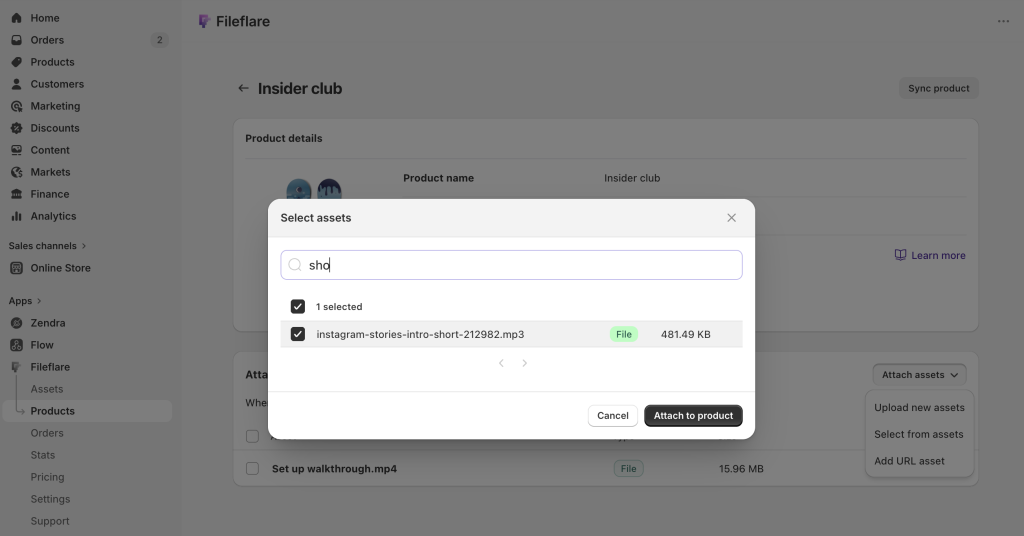
Attach multiple files to the same product. Most guides assume one file per product. Fileflare doesn’t care — attach as many files as you want. A course bundle with five video modules, an ebook with companion worksheets, a music pack with MP3s plus WAV stems — all handled by attaching multiple assets to the same product. The buyer sees all of them on their download page.
2. Attach to variants
Variant-level attachment. If you set up variants in Step 1, you can attach different files to different variants. The “Basic” variant might get a single PDF; the “Pro” variant gets the PDF plus source files plus a bonus video. Pick the product, pick the variant, attach the variant-specific files.
3. Attach via CSV
Bulk attach via CSV. If you have hundreds of products, attaching one at a time is slow. Upload your files to the Fileflare asset library first, then use Settings → CSV Import with a two-column CSV: product SKU on one side, the Fileflare asset name on the other. One row per attachment. Fileflare matches SKUs to your Shopify products and asset names to your library, and attaches in bulk.

One common gotcha: the CSV maps to files already in your Fileflare library — not files in your Shopify admin’s file storage. Upload everything to Fileflare first, then run the import.
There’s also a secondary path for external-link assets: if your CSV rows include a URL and file size in optional columns, Fileflare will create a new URL-type asset on the fly and attach it in the same step. That’s useful if you’re bulk-attaching links to course platforms, hosted videos, or anywhere else the file isn’t living in Fileflare directly.
Step 4: Choose where customers get the download
Shopify’s free Digital Products app does one thing — emails the buyer a link after checkout. Fileflare can do that, and also two other things most apps don’t. Using all three gives buyers the best possible “where’s my file?” experience.
Touchpoint 1: The order confirmation email. When a buyer completes checkout, Shopify sends an order confirmation. Fileflare can insert a download link directly into that email. The advantage: buyers trust the Shopify email, they’re already opening it to confirm the order, and the download link shows up immediately alongside their receipt. No waiting for a separate “your file is ready” email.
Touchpoint 2: The thank-you page. The thank-you page (sometimes called the order confirmation page) is what Shopify shows right after checkout. Fileflare can add a download button directly on this page, so buyers can click straight through from checkout to their file — no email hunting required. This is the fastest path from payment to downloaded file, and it’s the touchpoint buyers appreciate most on mobile.
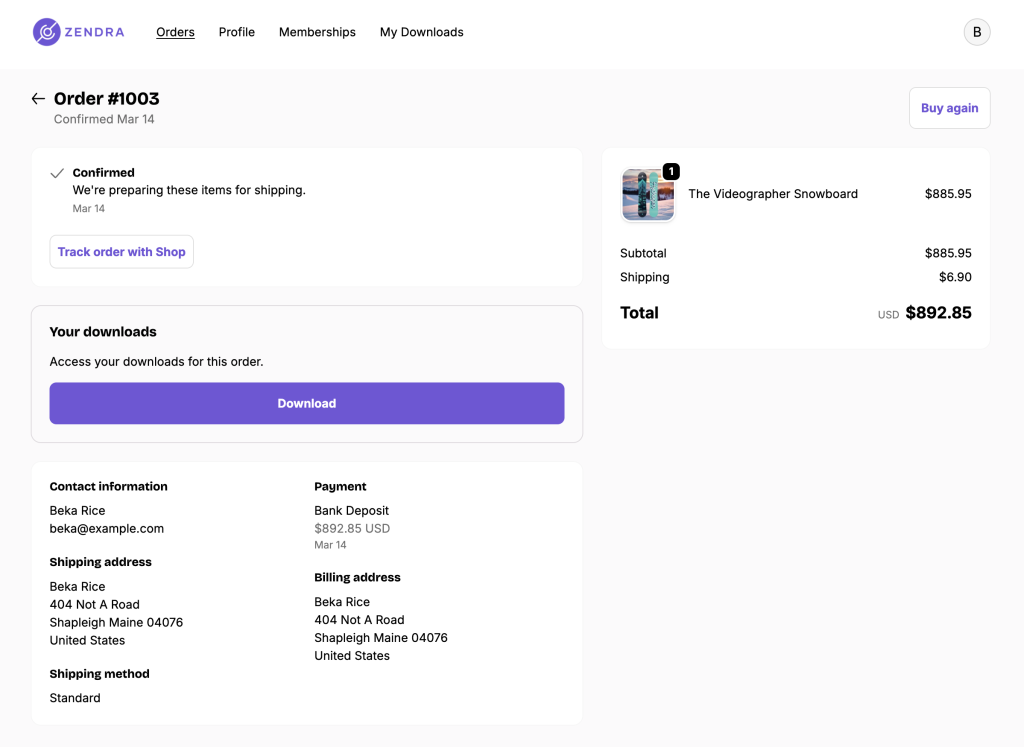
Touchpoint 3: The customer account page. If a buyer is logged into their Shopify account, Fileflare adds a View all downloads button to their order history. This matters three weeks after the sale — when the customer has lost the email, emptied the spam folder, and can’t find the file. Without this, they’re emailing your support inbox. With it, they log in and redownload themselves.

You can also send a separate Fileflare delivery email that’s distinct from Shopify’s order confirmation. This is useful if you want the download experience to be styled and branded differently from your transactional receipts — a big, branded “Your files are ready” email instead of a download link tucked into an order summary. More on customizing that email in Step 6.
Which to use. Most stores should enable all three. The order confirmation link is the highest-opened surface. The thank-you page is the fastest. The account page is what saves you from support tickets in month two. They don’t compete — they reinforce each other.
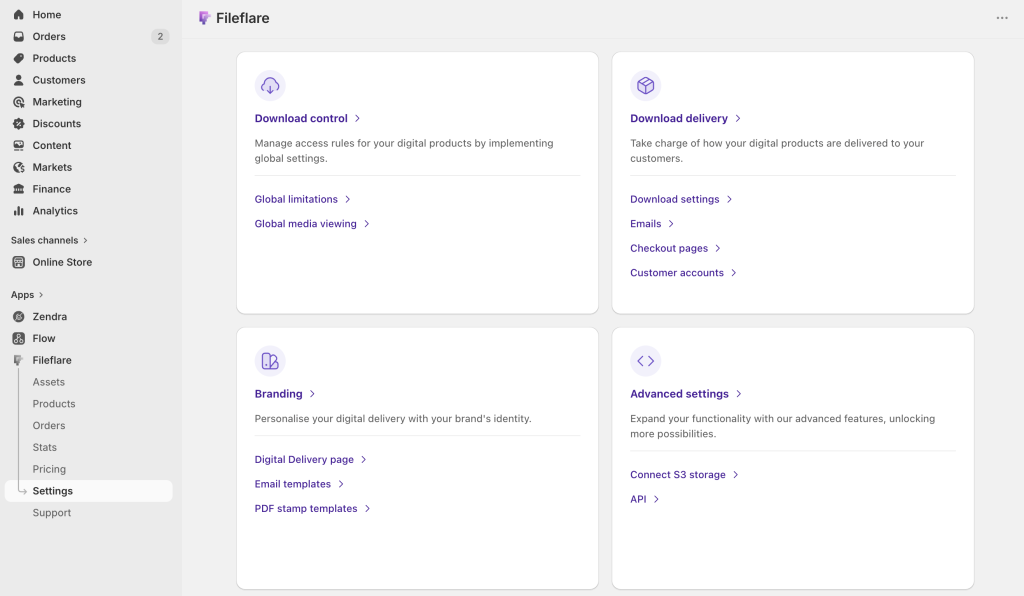
All three can be configured from from Fileflare → Settings → Download delivery.
Step 5: Customize the download page
When a customer clicks the download link — whether from the email, the thank-you page, or the account page — they land on a Fileflare-powered download page hosted on your own domain. Not fileflare.io. Not a generic app.shopifyapp.com URL. Your domain, your branding, your customer experience end-to-end.
You customize the download page in Fileflare → Settings → Download delivery.
Two page templates. Pick the layout that fits your catalog:
- Full-featured. The default. Shows every asset with filename, size, and file type. Supports in-browser viewers, consent gates, and all the optional elements below. Best for stores with multi-file products, video/audio courses, or anything where buyers want to preview before downloading.
- Simple. A single download link for each file with none of the extras. Best for single-file products and stores that want a deliberately simple experience. Loads fast, zero distraction.
Settings → Branding has further customization to the page, such as any instructional text you want above the files. If your products require setup instructions or tell buyers to extract a ZIP before using the contents, this is where that goes.
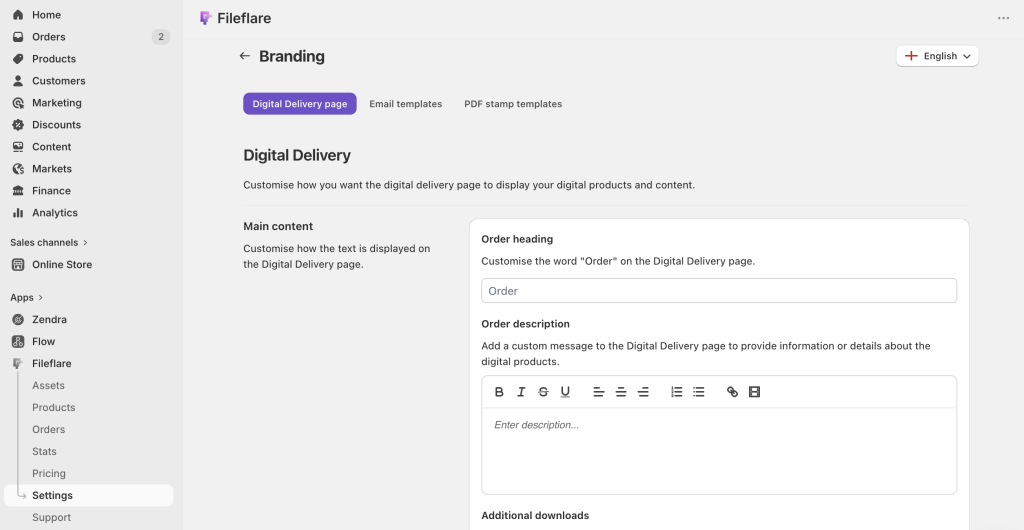
In-browser viewers. Fileflare can play media directly on the download page, without the customer downloading anything first:
- Video (MP4, MOV) plays in a built-in player.
- Audio (MP3, WAV, FLAC, and other common formats) plays in an inline audio player.
- PDF opens in an inline reader.
This matters for two reasons. First, for courses and preview-heavy products it reduces the “is this what I paid for?” anxiety buyers have immediately after checkout. Second, it’s the foundation of streaming-only mode — see Step 7.
Embedded video. You can also paste a YouTube, Vimeo, Loom, or Wistia URL into the order’s description field, and it renders on the download page as an embedded video. Great for a personal “thanks for your purchase, here’s how to get the most out of this” message from you to the buyer, or for course content hosted on a dedicated video platform.
Consent gate. If you need buyers to agree to a license, a terms-of-use document, or a copyright acknowledgment before downloading, turn on the consent gate. The page will require them to tick a box (with a link to your policy) before the download buttons unlock.
Login-required downloads. Optionally require buyers to be logged into their Shopify customer account before the download page renders. This adds friction but is worth it for high-value products where you want to tie every download session to a verified identity.

Step 6: Customize your delivery email
By default, Fileflare sends a delivery email from its own mail servers the moment an order is fulfilled. If this works for you, leave it on the defaults! But the delivery email is one of the most-opened messages you’ll ever send a customer, so it’s really valuable real estate — worth spending some time customizing it and adding relevant info that brings customers back when they open it again in the future.
Go to Fileflare → Settings → Branding in the Email templates section.
Three separate templates. Fileflare ships with three email templates you can customize independently:
- Delivery email. Sent when the order is fulfilled and files become available.
- File replacement email. Sent when you upload a new version of a file that an existing customer already bought (covered in Step 9).
- Scheduled release email. Sent when a pre-ordered file’s release date arrives.
Each template has its own subject line, sender name, and HTML body, so the tone can differ — your delivery email might be warm and branded, your file replacement email might be more transactional.
What you can edit. Sender name, subject line, and full HTML body. Template variables pull in dynamic values — customer name, order number, store name, download button, file list. The download button’s color, padding, and border radius are editable so it matches the rest of your brand.
Send from your own domain. Plug in a custom SMTP server or a SendGrid API key and your delivery emails go out from files@yourdomain.com instead of a Fileflare-hosted address. Better brand recognition with each message.
Turn emails off entirely. If you already handle delivery through a different system — Klaviyo, a course platform, a membership tool — you can disable Fileflare’s emails completely and use only the thank-you page and account-page touchpoints.
Step 7: Protect your files
The single biggest gap between Shopify’s free Digital Products app and a serious digital downloads workflow is protection. Shopify emails a link and trusts the customer. Fileflare gives you layered access controls that treat the link like a credential, not a free-for-all.
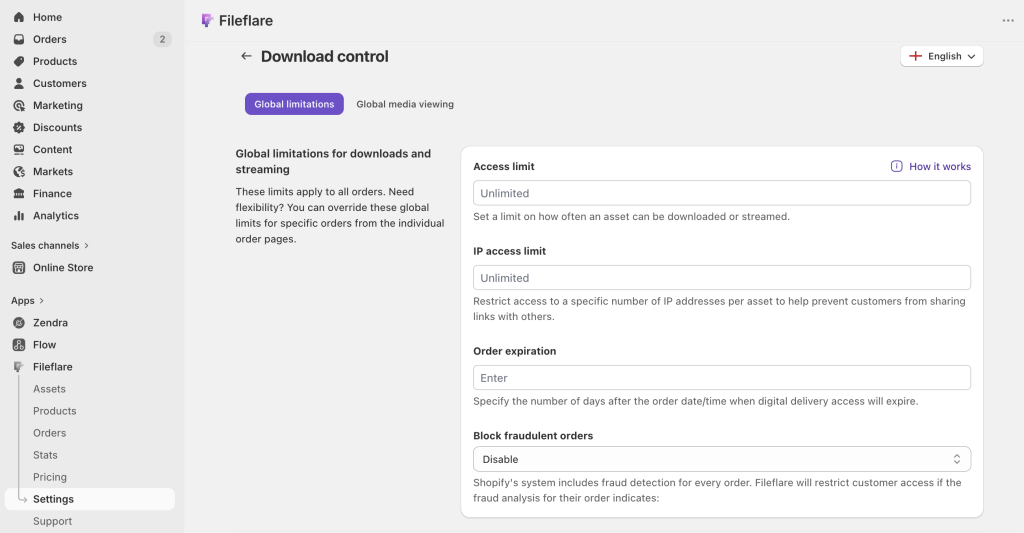
- Download limits. Set a maximum number of times each file can be downloaded per order. Most stores use 3–5. Fewer, and you’ll get support tickets from customers whose download failed mid-transfer. More, and you’re handing out free files to any customer who posts their link in a forum.
- IP address restriction. Cap the number of unique IP addresses a download link is accessed from. If a customer shares their link on Reddit and fifty strangers try to download, the link shuts off after the limit. Doesn’t stop determined sharing behind a VPN, but it ends the casual “I just pasted my link in a group chat” problem.
- Order expiration. Expire download access after a set number of days, or set a specific expiration date on individual orders. Useful for time-limited content, rentals, or evergreen products where you want a reasonable support window after which customers have to contact you to re-enable access.
- Fraud auto-blocking. Shopify’s built-in fraud analysis flags every order as low, medium, or high risk. Fileflare can automatically block download access on orders flagged as medium or high, so a stolen-card order doesn’t result in the file being downloaded before the chargeback comes through.
- Manual order blocking. Block or unblock any individual order with one click from the Fileflare admin. Useful when a customer charges back, demands a refund and returns the product, or when you spot a support ticket that smells fishy.
- Custom restriction messages. When a customer hits a restriction — they’ve used all their downloads, the order expired, the link is blocked — they see an error message. Fileflare lets you customize the copy for every restriction state, including an optional “Contact Us” button that opens to your preferred support channel. So the customer sees your voice and a way to reach you, not a generic “download denied” from the app.
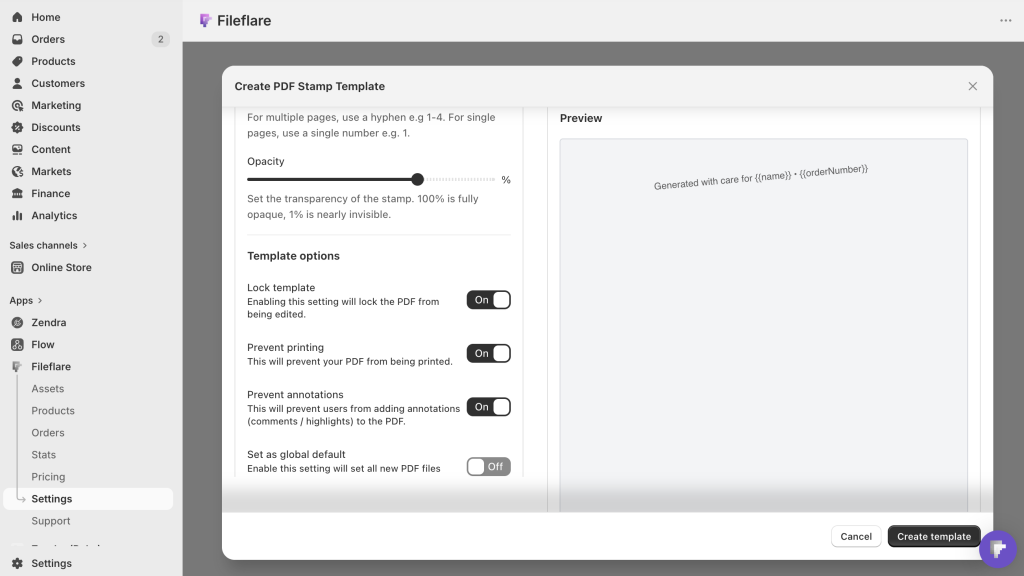
- PDF watermarking. For PDFs specifically, Fileflare can stamp every page at download time with the buyer’s name, email, order number, IP address, and billing or shipping address — individually or in combination. You can also overlay a logo or image on every page. This isn’t DRM — a determined pirate can still screenshot or retype the content — but it attaches the buyer’s identity to every copy of the file in circulation. If a stamped PDF shows up on a piracy site, you can see exactly whose account it came from and take action.
The stamping template is per-asset, so your ebook might stamp the buyer’s email in the footer while a tax guide stamps their name on the cover page. You can also lock stamped PDFs from being printed or annotated, and retroactively stamp existing PDFs so previously-sold orders get stamped copies on their next download.
PDF stamping is especially valuable for high-risk PDF products — ebooks, paid guides, design templates — where the cost of piracy is meaningful but download limits and IP caps are too blunt. Stamping doesn’t stop the first leak; it ties every copy in circulation back to a buyer, so when a stamped PDF turns up somewhere it shouldn’t, you know exactly who to follow up with.
- Streaming-only mode. If you want buyers to watch or listen without downloading — a video course you don’t want pirated, an audio sample pack that shouldn’t leave your store — turn on streaming-only mode. Buyers can play the file in the in-browser viewer but the download button is hidden.
Worth knowing: this is a UI-level control, not true DRM. A technically inclined buyer can pull the stream URL from the browser’s developer tools. Fileflare’s server also rejects direct download attempts, which adds a second layer. It’s a strong deterrent for 95% of buyers, not a lock.
Step 8: Test the customer experience
Before you flip the product out of draft, place a test order and walk the whole flow yourself. This catches more problems than any amount of admin-side inspection.
The test. From your storefront, add the product to the cart and check out. You can use a test discount code to zero out the price, or configure the Bogus gateway in Shopify’s test mode if you don’t want to run a real card.
Check all three touchpoints:
- Thank-you page. Does the download button appear? Clicking it — does it work?
- Order confirmation email. Does the download link show up in the email? Clicking it — does it open the Fileflare download page?
- Customer account. Log into the customer account used for the test order. Is the “View all downloads” button there? Clicking it — does it list the right files?
Check the download page. Is it branded correctly? Is the heading right? Are the files listed correctly? If you have in-browser viewers enabled, does the PDF / video / audio play?
Check the download. Actually download the file. Open it. Make sure it’s the right file, not a placeholder from a previous test.
Check restrictions. If you set a download limit of 3, download the file four times. The fourth attempt should hit the restriction message you customized in Step 7.
Fix whatever’s broken, re-test, and then flip the product live.
Beyond launch: operations that matter
Getting the first product live is the easy part. Running a digital downloads business for more than six months — keeping files updated, handling pre-orders, handling refunds, managing the long tail of customers who bought a year ago — is where most stores struggle. A few Fileflare features that address the long-term operational work.
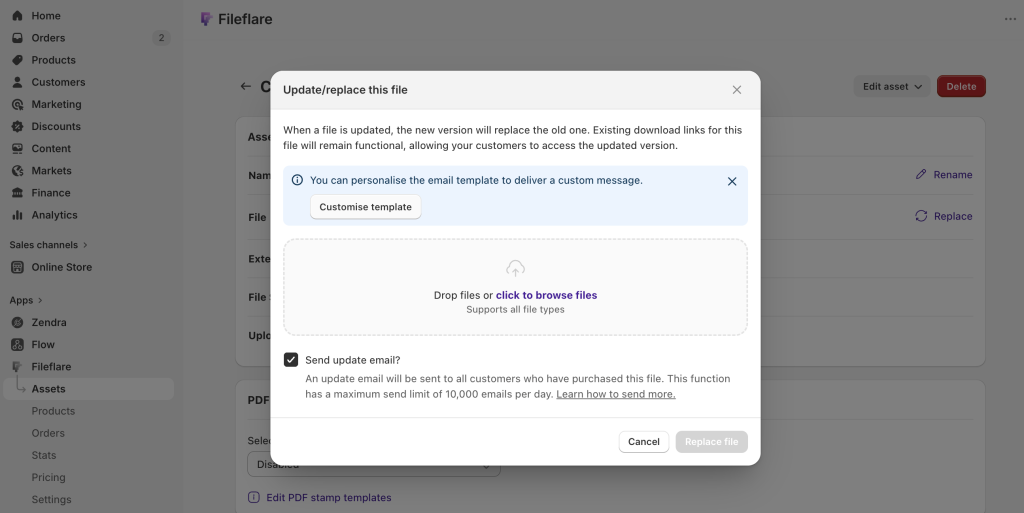
File replacement with buyer notification. If you fix a typo in your ebook, update a software version, or re-export a video at higher quality, upload the new version to Fileflare as a replacement for the existing asset. Because the asset ID is what’s attached to the Shopify order — not the specific file URL — every customer who already bought gets the new file the next time they download. Optionally, Fileflare can send an automated email to every previous buyer letting them know an updated version is ready.
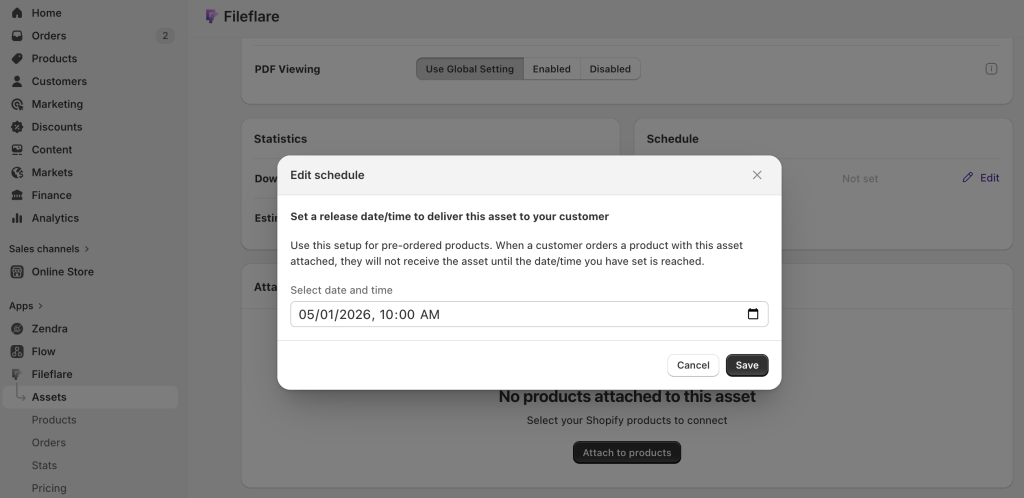
Scheduled releases for pre-orders. Set a release date in the future on a file, attach it to a pre-order product, and take orders before the file is ready. The moment the release date arrives, Fileflare emails every pre-order customer that their file is available — and the download links start working.
Historical order import. If you install Fileflare after the store already has digital orders, by default those existing customers can’t access their files through Fileflare — the orders predate the app. The historical import handles this: it walks back through your order history and marks eligible past orders as Fileflare-backed.
When a past customer logs in and opens their order, Fileflare generates a download link for whatever asset is now attached to that product. From the customer’s perspective, nothing changed — they open their account, the file’s there. No mass re-emailing, no complaints from long-tail customers who bought a year ago.

Download analytics. For every file, Fileflare tracks download count, bandwidth consumed, and timing. For every order, you see the IP address and browser used for each download attempt. Store-wide, you get line charts of downloads, digital orders, and emails sent and opened over any date range. Useful for spotting a file that suddenly has 500 download attempts from one IP (sharing) or a plan-limit overage coming.
Once your first product is live and the setup is humming, there are two adjacent playbooks worth reading. Post-purchase upsells on Shopify covers how to pull more value out of each customer after the first order — digital companions, bundles, and one-click add-ons that compound on top of your existing acquisition spend. And the common mistakes when selling digital products covers the operational patterns that catch up with stores around month six.
When to upgrade your plan
The free Fileflare plan covers many of the features in this guide — it’s how we recommend starting. Plans tier up as your catalog and order volume grow: more storage, higher monthly order caps, more advanced file protection and access controls, custom S3 connections, and team features.
You’ll generally know it’s time to upgrade when:
- You’re bumping against your storage quota and you need to add more content.
- You want to further customize the branding of your download pages or emails.
- You want features the free plan doesn’t include: PDF stamping, custom SMTP for email delivery, or other plan-tiered capabilities.
The full plan comparison lives on the Fileflare pricing page. Prompts appear in the admin when you hit a plan limit, so you won’t wake up one morning to a broken store.
If you’d rather skip picking a plan — or skip this entire setup — our services page lays out our paid setup, migration, and launch-help packages. Getting a bit if help is especially useful if you’re moving from another platform, launching a new store, or just want someone else to handle the configuration.
If you’re earlier in the decision and still comparing apps, our comparison of digital downloads apps for Shopify covers what each major app does best, where each falls short, and which one fits which use case.
Common questions
Can I sell digital downloads on Shopify without a separate app?
Yes. Shopify ships with a free Digital Products app that handles basic delivery. It works for single-file, low-volume products — but caps at 5 GB per file, has no branded download page, no access controls, no watermarking, and no analytics. Most stores outgrow it within their first 50 digital orders. For anything beyond hobby volume, use a dedicated app.
Can I sell the same file with different pricing tiers?
Yes, with variants. Create one product with multiple variants (e.g. “Personal License $20”, “Commercial License $100”), and attach different assets — or the same file with different stamp templates — to each variant.
Can I sell physical and digital products together?
Yes. Add both the physical product and the digital product to your store, or create a single product with one variant that’s physical and one that’s digital. Fileflare attaches to the digital variant only. The physical variant ships normally.
Can I use digital downloads as a lead magnet? (Give a free file in exchange for an email?)
Yes — through a free product. Fileflare delivers files through Shopify orders, so the lead-magnet pattern is: create a product priced at $0.00, point a landing page or signup form at it, and have the form place the order on submission. The buyer still gets your branded download page and delivery email, and the email address lands in Shopify’s customer list like any other order. Every part of the experience stays consistent with the rest of your store, rather than splitting into a separate lead-capture tool.
What about refunds?
Fileflare doesn’t block refunds — that happens in Shopify. But you can manually block the order’s download access the moment you issue a refund, so the customer can’t download the file again after their money is back in their pocket. The fraud auto-block setting does the same thing automatically for Shopify-flagged risky orders.
You can also have a consent gate on download, informing the user that they are no longer eligible for a refund once they download an item.
Can I stop people from downloading the video but let them watch it?
Yes — turn on streaming-only mode. The video plays in the in-browser viewer; the download button doesn’t render. Worth knowing: this is a UI-level control. A technically motivated buyer can still grab the stream URL from browser DevTools. It deters casual sharing; it’s not DRM. Streaming-only is also a global setting right now — it applies to every streamable asset in your store, not one specific high-value file.
What happens if a buyer accesses their download link months or years later?
Depends on your configuration. If you set an order expiration or download limit, the link stops working after that. If you didn’t, it works indefinitely — as long as the asset still exists in your Fileflare library. If the buyer has a Shopify customer account, the account-page download link also persists, so they always have a way back to their files.
Further reading
This guide is the foundation. A few deeper-dive posts that build on it:
- How to protect digital products from piracy on Shopify — beyond download limits and expirations, what actually works for preventing file sharing.
- How to watermark PDFs automatically on Shopify — a walkthrough of PDF stamping, template design, and print / annotation locking.
- How to sell printables on Shopify — focused guide for Etsy sellers, planner makers, and printable-product creators.
- How to sell PDFs on Shopify — the PDF-specific version of this guide, including cover design, stamping, and piracy considerations.
- Selling digital downloads, from Etsy to Shopify — a detailed comparison for Etsy sellers considering the switch.
If you’ve worked through this guide and you’re still stuck — or you’d rather skip the setup entirely — get in touch. We help stores launch, migrate from other platforms, and fix misconfigured setups.